How to Add a Disqus Conditional Load Comments on Ghost
In today, Ghost Tutorial Series Part we are going to see About How to Add a Disqus Conditional Load Comments on Ghost Blogging Platform.
In Our Previous post, we see About How to Add a Custom Favicon on Ghost Blogging Platform.Now in this tutorial part we going to learn about How to Install a Disqus Comment System in Ghost Blogging Platform.
Ghost Does not having the Default Comment system Like Blogger and WordPress, so we use third party Comment System in Ghost Blog CMS.
We Choose Disqus Comment System for Ghost Blog
Here’s the reason why we Choose Disqus Comment system
- SEO Friendly
- Responsive
- Easy to Manage
- Spam Filtering
- Social Login’s
- Guest Comments
- and More
Ok Let’s Go to our tutorial part
How to Add a Disqus Conditional Load Comments on Ghost Blogging Platform?
Before that, I want to explain about Disqus Conditional Load comments.It loads asynchronously Default Disqus comment code take some loading time display the comments.This plugin code is written with pure javascript, and it doesn’t require Jquery.it will show Disqus comments while Users Scroll down the post page.
For More Details about this plugin check Labnol article – Load Disqus Comments on Click
First, we Need to Create an account on Disqus Commenting Platform
- Create New Account on disqus.com (Already having the account Means login to your account)
- Go to https://disqus.com/admin/create/
- Create a “New Site.”
- Enter your website name It create a Disqus short name for your website
- After that Choose your web site Category
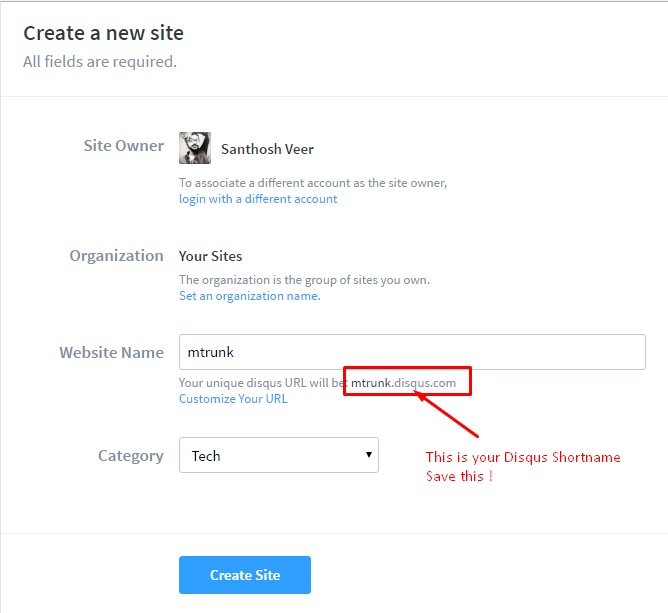
- Click Create site button
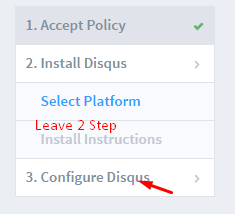
- It shows the welcome page Click Get Started and Move to Next Step
- Now it shows the “Platform page for Disqus Comment Installation just leave that step and Go to “Configure Disqus.”
- Adjust your Disqus site settings
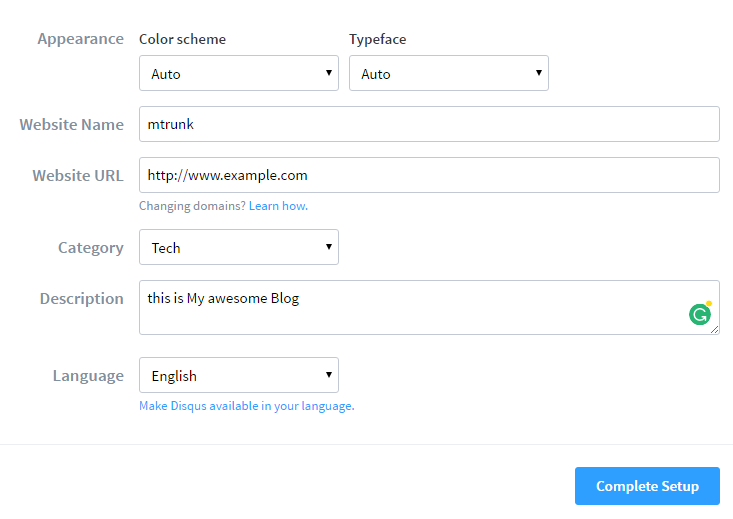
- After all set up Click the “Complete Setup” Button to complete your Disqus site setup
- Copy your Disqus short URL [Look like this example.disqus.com – example is your Disqus shortname]
Now to Steps to Add a Disqus Conditional Load Comments on Ghost blog posts
- Login to your Ghost blog Admin dashboard
- Go to Code Injection on the Dashboard
- Copy this Below Code and paste it on Blog Footer Box
<script type="text/javascript">
 window.onscroll = function(e) {
 if ((window.innerHeight + window.scrollY)
 >= document.body.offsetHeight)
 {
 if (!disqus_loaded) disqus();
 }
};
</script>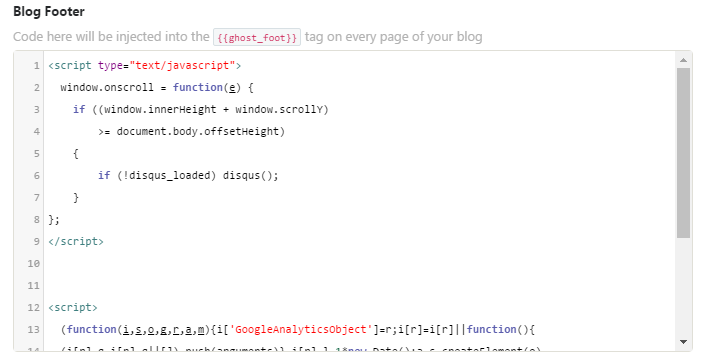
- and Save it
- Now Open your Ghost Blog Files from FTP (use FileZilla FTP to manage and Edit your Ghost Blog Files)
- Go to /var/www/ghost/content/themes/Casper/post.hbs (path is Differ according to host service this one from Digitalocean)
- Open post.hbs file
- Search this below lines (Note – this code structure from Casper theme this structure may different if you are using different Ghost Blog theme)
<section class="post-content">
 {{content}}
</section>- Now Copy and paste this Code on Below {{content}}
<div id="disqus_thread"></div>

<script type="text/javascript">

// Replace quoteswritten with your disqus shortname
var disqus_shortname = "quoteswritten";

// permalink of your web page / blog post
var disqus_url = "{{url absolute="true"}}";

// permalink of your web page / blog post
var disqus_identifier = "{{comment_id}}";

var disqus_loaded = false;

// This is the function that will load Disqus comments on demand
function disqus() {

if (!disqus_loaded) {

// This is to ensure that Disqus widget is loaded only once
disqus_loaded = true;

var e = document.createElement("script");
e.type = "text/javascript";
e.async = true;
e.src = "//" + disqus_shortname + ".disqus.com/embed.js";
(document.getElementsByTagName("head")[0] ||
document.getElementsByTagName("body")[0])
.appendChild(e);
}
}

</script>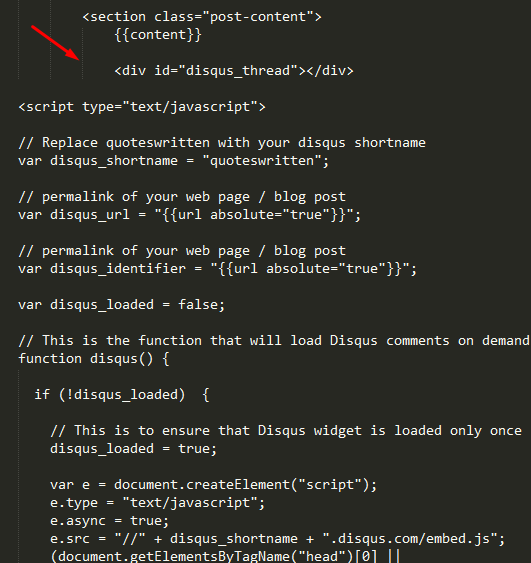
- Replace “quotes written” with your Disqus Shortname
Full Code Structure after adding the Disqus Conditional loading Comment code on the post.hbs file.
<section class="post-content">
 {{content}}

<div id="disqus_thread"></div>

<script type="text/javascript">

// Replace quoteswritten with your disqus shortname
var disqus_shortname = "quoteswritten";

// permalink of your web page / blog post
var disqus_url = "{{url absolute="true"}}";

// permalink of your web page / blog post
var disqus_identifier = "{{comment_id}}";

var disqus_loaded = false;

// This is the function that will load Disqus comments on demand
function disqus() {

if (!disqus_loaded) {

 // This is to ensure that Disqus widget is loaded only once
 disqus_loaded = true;

 var e = document.createElement("script");
 e.type = "text/javascript";
 e.async = true;
 e.src = "//" + disqus_shortname + ".disqus.com/embed.js";
 (document.getElementsByTagName("head")[0] ||
 document.getElementsByTagName("body")[0])
 .appendChild(e);
 }
}

</script>

</section>
- You can also add this Disqus comment system on Post Footer.This tag <footer class=”post-footer”> mention’s the post footer
- In post Footer it having the Author box, Share buttons, and subscription box add the Disqus comment script inside the <footer> </footer> Tags (Code structure will Differ if you are using a different theme, but you can easily find the Content and post footer part.
- That’s all successfully we Install the Disqus Conditional Load Comments on Ghost Blogging Platform
- After Installation and Setup Open your SSH Restart the Ghost Service & Nginx
From the Editor’s Desk
Theme structure part will differ according to your Ghost theme so be careful with Edit/Modify the Post.hbs. File before editing this file take a backup.
Hope this tutorial will help you to add Lazy load Disqus Comment system on your Ghost Blog.If you have any doubts in this topic Feel Free to Comment Here, I will Guide you 🙂
Ghost Installation Guide – Install Ghost Blog CMS on Digitalocean
Was this article helpful?
Thanks!Your feedback helps us improve Allwebtuts.com

How to Add a Disqus Conditional Load Comments on Ghost
How to Add a Disqus Conditional Load Comments on Ghost
In today, Ghost Tutorial Series Part we are going to see About How to Add a Disqus Conditional Load Comments on Ghost Blogging Platform.
In Our Previous post, we see About How to Add a Custom Favicon on Ghost Blogging Platform.Now in this tutorial part we going to learn about How to Install a Disqus Comment System in Ghost Blogging Platform.
Ghost Does not having the Default Comment system Like Blogger and WordPress, so we use third party Comment System in Ghost Blog CMS.
We Choose Disqus Comment System for Ghost Blog
Here’s the reason why we Choose Disqus Comment system
Ok Let’s Go to our tutorial part
How to Add a Disqus Conditional Load Comments on Ghost Blogging Platform?
Before that, I want to explain about Disqus Conditional Load comments.It loads asynchronously Default Disqus comment code take some loading time display the comments.This plugin code is written with pure javascript, and it doesn’t require Jquery.it will show Disqus comments while Users Scroll down the post page.
For More Details about this plugin check Labnol article – Load Disqus Comments on Click
First, we Need to Create an account on Disqus Commenting Platform
Now to Steps to Add a Disqus Conditional Load Comments on Ghost blog posts
<script type="text/javascript"> window.onscroll = function(e) { if ((window.innerHeight + window.scrollY) >= document.body.offsetHeight) { if (!disqus_loaded) disqus(); } }; </script><section class="post-content"> {{content}} </section><div id="disqus_thread"></div> <script type="text/javascript"> // Replace quoteswritten with your disqus shortname var disqus_shortname = "quoteswritten"; // permalink of your web page / blog post var disqus_url = "{{url absolute="true"}}"; // permalink of your web page / blog post var disqus_identifier = "{{comment_id}}"; var disqus_loaded = false; // This is the function that will load Disqus comments on demand function disqus() { if (!disqus_loaded) { // This is to ensure that Disqus widget is loaded only once disqus_loaded = true; var e = document.createElement("script"); e.type = "text/javascript"; e.async = true; e.src = "//" + disqus_shortname + ".disqus.com/embed.js"; (document.getElementsByTagName("head")[0] || document.getElementsByTagName("body")[0]) .appendChild(e); } } </script>Full Code Structure after adding the Disqus Conditional loading Comment code on the post.hbs file.
<section class="post-content"> {{content}} <div id="disqus_thread"></div> <script type="text/javascript"> // Replace quoteswritten with your disqus shortname var disqus_shortname = "quoteswritten"; // permalink of your web page / blog post var disqus_url = "{{url absolute="true"}}"; // permalink of your web page / blog post var disqus_identifier = "{{comment_id}}"; var disqus_loaded = false; // This is the function that will load Disqus comments on demand function disqus() { if (!disqus_loaded) { // This is to ensure that Disqus widget is loaded only once disqus_loaded = true; var e = document.createElement("script"); e.type = "text/javascript"; e.async = true; e.src = "//" + disqus_shortname + ".disqus.com/embed.js"; (document.getElementsByTagName("head")[0] || document.getElementsByTagName("body")[0]) .appendChild(e); } } </script> </section>From the Editor’s Desk
Theme structure part will differ according to your Ghost theme so be careful with Edit/Modify the Post.hbs. File before editing this file take a backup.
Hope this tutorial will help you to add Lazy load Disqus Comment system on your Ghost Blog.If you have any doubts in this topic Feel Free to Comment Here, I will Guide you 🙂
Ghost Installation Guide – Install Ghost Blog CMS on Digitalocean
Your feedback helps us improve Allwebtuts.com
Related Posts
How to Configure SMTP Mail service for Ghost Blog
How to Get the Current Page URL on Ghost Blogging Platform
How to install Ghost CMS on Digitalocean – Ghost Installation Tutorial
About The Author
Santhosh veer
Blogger - Web Developer - Open Source Lover