

SMTP Mail service for Ghost Blog
Ghost SMPT Mail Server Set Up Guide
In this Tutorial, we are going to see about Ghost Mail Configuration with SMPT services.In WordPress, we have default PHP Mails.
For both Incoming and Outcoming so we no need to make an extra configuration on WordPress.
But In Ghost, it is Little Bit different we need to Configure SMTP Mail service for Ghost Blog for Outgoing Mails.its is Not a Complicated work Ghost Having Node Mailer pack for this so we can Just Authorize our SMPT Mail service.
Why We Need SMTP Mail service for Ghost Blog?
- For New Author Invitation
- Forget Password reset Mail
- RSS Feed Mail’s (Recently Ghost introduce RSS Email Feature but this feature in Beta version)
How to Configure SMTP Mail service for Ghost Blog
It’s very easy to set up for that we need third party email services our Outgoing Emails.
Services I recommended for Ghost Mail
- Mailgun
- Sendgrid
- Gmail (use it for personal Blogs)
How to Configure the SMPT Mail service on Ghost Blog?
Ghost Already has the Node Mailer package, so you Just Authorize your SMPT service to your Ghost Blog.
- Open the Ghost CMS Installed folder From FTP or SSH
- you can find the file config.production.json file
- Open that file (before edit the file take a backup)
- We need to Attach our SMPT JSON Script on the config.production.json file
How to Configure the Mailgun SMPT on Ghost Blog
- Sign up for a new account on Mailgun.com it having Free plan already having account means just log into your Mail gun account
- Verify your Email and create subdomain for sending domains
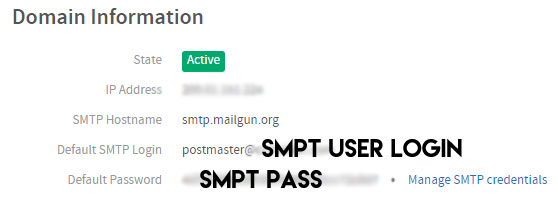
- Now open your Verified sending domains
- you can get your SMPT credits on the “Domain Information.”
- Now attach this below JSON code on config.production.json file
"mail": {
 "transport": "SMTP",
 "options": {
 "service": "Mailgun",
 "auth": {
 "user": "[email protected]",
 "pass": "XXXXXXXXXX"
 }
 }
 },
- Replace [email protected] and XXXXXXXXX with your Mailgun SMPT username and Password.
- After all, edits restart the Ghost
- Now login to your Admin Dashboard
- Go to Labs
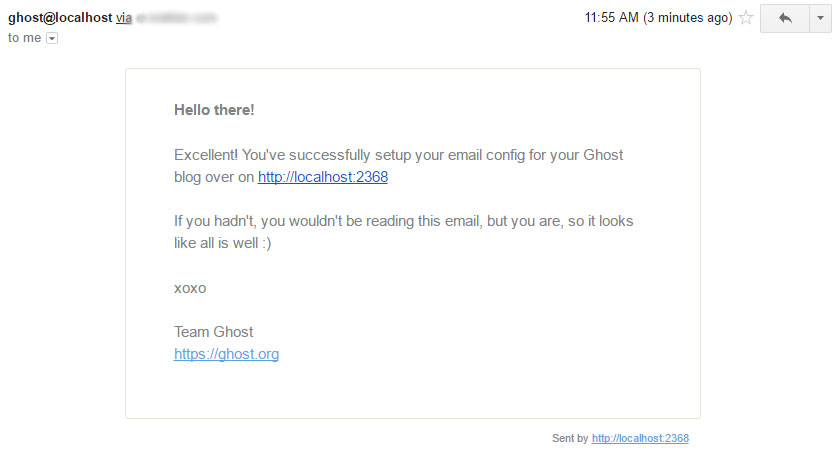
- you can Find the “Send Test Mail.”
- Just Click Send to test whether the Mail Function is working or not
How to Configure the Sendgrid SMPT on Ghost Blog
process are same as above step Just make a Little Bit Modification for Sendgrid
- Sign up for Free account in Sendgrid.com (already having account login to your account)
- After all Sendgrid account verification
- Create API Key for outgoing emails
- Allow the “Mail Send” Function in API permission
- Already we having the Mailgun JSON Code on our config.production.json
- Just find this line “service”: “Mailgun”, on the JSON Code and replace it with “service”: “Sendgrid”,
In recent Updates, we no Need to create an SMPT account on Sendgrid Just create an API Key for permission we use our Sendgrid Account Username and password as SMPT Authorization credits.
Full example code
"mail": {
"transport": "SMTP",
"options": {
"service": "Sendgrid",
"auth": {
"user": "User",
"pass": "XXXXXXXXXX"
}
}
},- Replace User and XXXXXXXXXX with your Sendgrid Account username and Password
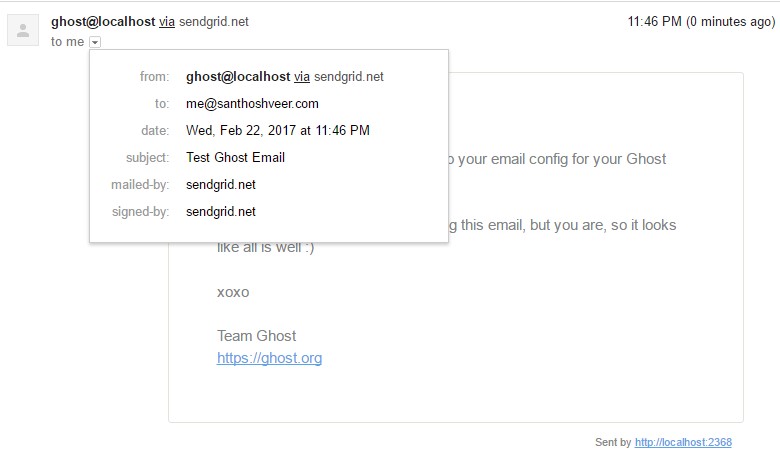
- same as above steps go to labs from your Ghost Admin Dashboard and send a test Email
Test Mail Output from Sendgrid
How to Configure the Gmail SMPT on Ghost Blog
We can also use Gmail Mailing service as SMPT service for blogs/websites for this Create a separate Gmail account but use Gmail SMPT service for personal blogs.
Process is same as above methods also code replacement is also like Sendgrid method Just replace “service”: “Mailgun”, with “service: “Gmail”,
Full Example code
"mail": {
"transport": "SMTP",
"options": {
"service": "Gmail",
"auth": {
"user": "[email protected]",
"pass": "yourpassword"
}
}
},- For Gmail, we Must enable the IMAP and Enable less secure apps
- Enable IMAP – After login to Gmail account you can see the Settings Gear Icon Below the Gmail Profile Image
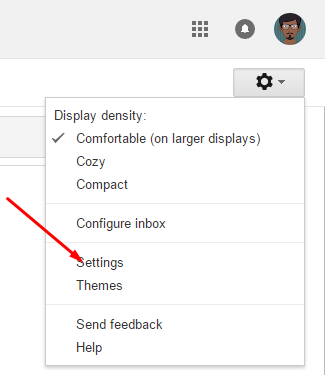
- Click the Icon and go to settings
- Go to Forwarding and POP/IMAP section
- Enable IMAP and click Save Changes

- After this setting Enable less secure apps to get the Third party authorization permission
- Open Less secure section and Turn on that option
- That’s all Now restart the ghost and send the test Mail all outing emails are stored in Sendmail
Test Email Output

How to Set From address and Name on Ghost Mail?
By default, there is No Custom From Sendmail and Sender Name on Ghost SMPT so we need to Add Custom Functions on our SMPT Mail Code
Add the Below lines on Mailer script
From Name
"mail": {

"from": "'Santhosh veer' <[email protected]>",

}
From Address
"mail": {
from: "[email protected]",
}
From the Editor’s Desk
- By Default, it was Configure to Direct Mail Just replace it with SMPT Service MAIL
- After all, Configuration don’t forget to restart the ghost blog and server
- Cloud VPS user’s use this below command line to Restart your Ghost blog and Nginx
ghost restart

sudo service nginx restart
sudo service ghost restart
sudo service nginx restart
If your Ghost Blog Hosted on Cpanel Based web server contact your Hosting provider for restarting the Ghost blog or if you have the permission to access the SSH then try this below command line to Restart the Ghost blog
"service": "Mailgun", - for Mailgun

"service": "Gmail", - for Gmail

"service": "Sendgrid", for Sendgrid
- Don’t forget to save the settings and Restart the ghost blog
- Official – Ghost Mail Configuration Documentation
Wrapping Up
Hope this tutorial will help you to Setup SMTP Mail service for Ghost Blog.if you Any Doubts in this topic drop your Comments Here I will Guide you.
Ghost Blog Installation Guide
Your feedback helps us improve Allwebtuts.com


